Thursday, December 20, 2012

Cara membuat skirt box pleat (lipat kotak)


Rujuk cara membuat smoking skirt.

1. Sediakan kain sederhana tebal keperluan lebar tingkap 78 inci x 3 (formula lipat kotak) kain segi empat panjang berukuran 234 inci lebar dan 19 inci labuh.

2. Kedudukan bentuk lengkung pola kain skirt bergantung pada scallop yang diperlukan, di sini diperlukan 3 scallop, maka kain skirt perlu dibentuk hingga mendapat tiga ruang lengkung untuk meletakkan setiap scallop.

Cara membuat Angsana Scallop


1. Setiap tepi kain yang menyerong diberi poin 4 inci dari atas, diikuti 4 inci kemudian 1 inci, diikuti 4 inci, 1 inci, seterusnya berselang seli hingga ke bawah sekali 8 inci.

2. Dari bahagian hadapan kain yang sudah dicantum, susunkan ke atas (lihat gambar). Poin 4 inci kedua diletakkan pada bahagian bawah poin 4 inci pertama lalu dipin, kemudian poin 4 inci ketiga dibawa ke poin 1 inci. Teruskan hingga akhir. Pada poin 8 inci terus dilipat tiga bahagian. Pastikan semua jarak 1 inci sahaja yang akan kelihatan di permukaan.

3. Pada bahagian tepi dan tengah kain scallop yang telah disusun dan dipin, jahit mati setiap susunan scallop.

Friday, August 10, 2012

Cara Mudah Menjahit Langsir - Skirt Smoking


MENCARI ELA ATAU METER KAIN

1) Sediakan kain berukuran 300 inci lebar dan labuh 20 inci.

2) Kain dilipat dua, kemudian dibentuk mengikut rajah di sebelah dan beri poin tengah.


CARA MENJAHIT

1) Kain langsir dilipat kotak 3 inci lalu dijahit perlahan-lahan menggunakan mesin jahit.

2) Ukur 6 inci dari bahagian atas kain langsir ke bawah, lalu pin pada setiap kiri dan kanan lipat kotak 3 inci.


Dari buku Cara Mudah Menjahit Langsir oleh Noraini Margono Jilid 2


Thursday, August 9, 2012

Cara Mudah Menjahit Langsir oleh Noraini Margono Jilid 2 PDF


Download PDF


Menyediakan pelbagai rekaan langsir yang menarik dan mudah dibuat. Buku ini adalah lanjutan daripada Cara Mudah Menjahit Langsir yang pertama. Setiap rekaan langsir disediakan panduan mengambil ukuran kain, cara menggunting dan cara menjahitnya. Panduan langkah demi langkaj yang diberi dapat membantu menyediakan langsir yang cantik.

Buku ini amat sesuai untuk dijadikan panduan kepada mereka yang berminat untuk menjahit langsir sendiri. Jika anda sudah berkemahiran ia boleh dijadikan sumber pendapatan.

Beli buku secara online

Wednesday, August 8, 2012

Buat tirai langsir tanpa jahitan - panduan langkah demi langkah


Panduan langkah demi langkah bagi mereka yang mahu membuat tirai langsir sendiri tetapi tidak pandai menjahit atau tidak mempunyai peralatan menjahit. Aktiviti ini hanya menggunakan pita pelekat dan hot glue. Perlu diingatkan bahawa tirai langsir seperti ini tidak boleh dibasuh menggunakan mesin basuh kerana akan merosakkan pelekat. 

------------------------------


Make Your Own No Sew Curtains

A couple of weeks ago we fell in love with some bright floral fabric, so much so that we bought six yards of it on the spot with plans to bring it home and make curtains for our master bedroom. Since Amy thinks sewing is man work in our house and Chad thinks curtains are woman work – this put us in quite a conundrum. The solution for us? Easy curtains, no sewing.  By the way doesn’t our new wall color look so bright? Love it.
Supplies:
  • Fabric
  • Scissors
  • Iron and Ironing Board
  • Heat n’ Bond Ultrahold Iron-on Fabric Adhesive, 5/8” wide
  • Curtain Rods for Hanging
Step One: Measure your window to determine how much fabric you’ll need and cut it appropriately.  We used 97” of length for each of our panels so that we could mount them as close to our crown molding as possible and have them drape to the floor. A traditional width for curtain panels is 54” wide. This is also the standard width for upholstery grade fabric, which is what we bought. However we split this down the middle for two reasons. One, we had narrow windows that couldn’t really handle such thick drapes, and we wanted to save money and avoid buying twelve yards instead of just six for two windows. So in the end we cut our fabric to accommodate four panels, each 27” wide and 97” long.
The easiest way to get our less than standard width was to cut the proper length and then fold the fabric over onto itself on the floor, cutting the crease down the middle. Worked like a charm.
Step Two: Iron down about one inch of fabric on all four sides of your curtain panel as if you were creating hem.
Step Three: Cut your Heat n’ Bond adhesive tape to the necessary lengths. Lay it inside the hem-like flap you’ve created, paper side up. Using an iron on a medium-high setting, iron the entire length of the tape for just about 2-3 seconds per section. Tip: for four curtain panels we used 3 rolls of this adhesive, purchased from JoAnne’s Fabrics and Crafts for $3.48 each.
Step Four: Allow the ironed on tape to cool completely. This is very important. If you don’t allow it to cool completely for just a minute or two it won’t adhere properly. Once it is cool though, peel the paper side of the tape off, lay down your fabric “hem” flap and iron on for about 10 seconds each section.  Allow the curtains to cool completely before hanging.
Step Five: You have a couple of options for hanging. You can just “sew” one large rectangular piece of fabric and attach it to your curtain rod with a round curtain clips or you can make a rod pocket with the same tape method. Just fold the top of your curtain panel over by about six inches and use the tape to adhere it to itself, creating a pocket for your curtain rod.
Again, it’s important to allow the curtain to cool completely before hanging it.
Also, if you’re making a pocket like this be sure to incorporate that into your measurements you’ll need an extra six inches or so for a pocket.
Optional: We hot glued two ribbons to the outside length of our curtains for just a little added layering, using a wide green ribbon and then topping it with a lighter blue polka dotted ribbon. Love how it turned out. You can also use the iron table for this too.
The entire project will probably take you about an hour and a half, more if you have more than two windows. It isn’t likely to save you more time that sewing would but if you’re like us and don’t have a machine or the sewing experience, this is a great solution. All we’ve heard is that the adhesive tape doesn’t hold up in the washer so if you need to clean your drapes you might be in trouble. Luckily for us we don’t clean that much around here.

http://www.trianglehoneymoon.com/make-your-own-no-sew-curtains/ 

Tuesday, August 7, 2012

8 cara mudah membuat langsir tanpa jahitan

Dengan sedikit imaginasi dan penggantung ringkas, anda mampu mengubah fabrik menjadi langsir tingkap yang menarik. Ikuti 8 cara mudah menghasilkan tirai langsir menggunakan pelbagai jenis aksesori penggantung tanpa sebarang jahitan.

------------------------------


Curtains with hooks
Thomas J. Story

8 Ways

... to cover your windows without touching a needle.
With a little imagination and some simple connectors, you can turn any piece of fabric into an attractive window covering.
To make these supereasy curtains, choose a fabric that already has finished edges, such as a vintage linen, printed sheet, or pre-hemmed holiday fabric from the craft store. Then pair it with the hook, clip, or grommet that best matches it. For inspiration, take a look at some well-connected examples.

Curtains with Rings
Thomas J. Story

Method No. 1: Clip it on.

Clip rings onto a pre-finished edge of material and slip them over your curtain rod. This method makes it easy to swap styles to match season or mood, or to use the cloth again for something else. Varieties of clip-on curtain rings are available through companies like IKEAandSmith+Noble

Curtain Channel
Thomas J. Story

Method No. 2: Iron with ease.

Using iron-on fusing tape, create a channel at the top of your curtain wide enough for a rod or wood dowel to pass through.

Curtains with Loops of Fabric
Thomas J. Story

Method No. 3: Button it up.

Even if you want the finished look of buttons, you still don't need to sew them onto the curtains. Instead, thread fine wire through buttons to connect loops of grosgrain ribbon to fabric.

Curtains with Grommets
Thomas J. Story

Keep things clean and simple.

Grommets, slipped over wall hooks, produce a simple, crisp window treatment. Grommet kits are easy to use and widely available at fabric and craft stores.

Curtains with Long Loops
Thomas J. Story

Method No. 5: Long loops

Rayon cording tied through grommets gives a finished look. Cut equal lengths of cord and tie, and hide the knot behind the grommet.

Curtains with Team Beaded Loops
Thomas J. Story

Method No. 6: Beaded links

Team beaded loops, made from 24-gauge wire, with wall hooks for an easy fix. Poke a hole in the fabric with a straight pin and the wire will pass through.

Curtains With Simple Curtain Rings
Thomas J. Story

Method No. 8: Matching coils

Thread beads on "memory wire" (wire coils that retain circular forms, available in bead shops) to make a simple curtain ring. Choose a hue that matches the fabric or pick up an accent color from elsewhere in the room.

Sunday, August 5, 2012

7 tips menaikkan seri langsir bilik tidur


Pakar senireka dalaman menemui 7 cara untuk menaikkan seri langsir bilik tidur samada bagi mendapatkan kesan romantik, pencahayaan atau hiasan tingkap.

----------
http://www.hgtv.com/decorating/7-beautiful-window-treatments-for-bedrooms/pictures/index.html

7 Beautiful Window Treatments for Bedrooms

Whether looking for romantic ambiance, blinds to control sunlight or window treatments to protect your privacy, design experts uncover seven ways to dress up bedroom windows.By Jackie Dishner

Drape With Silk

For a luxurious and romantic ambiance in the boudoir, designer Sharon McCormick pampers the bedroom in silk drapery panels, choosing a restful, sea glass color. Add pleats, tassels, crystals, beads or buttons for a custom touch. Included underneath is a remote-controlled window shade for privacy. Image Courtesy of Sharon McCormick. Photo by Urso Photography.

Mix It Up

Designer Kati Curtis favors a combination of simple sheer and opaque draperies in her Manhattan bedroom designs. The sheer fabric stays open during the day to allow light in. At night, the opaque panels help buffer sound and keep light out for a good night's sleep. For a sleek touch, hardware is hidden in the window pocket. Image Courtesy of Kati Curtis.

Pleat From Floor To Ceiling

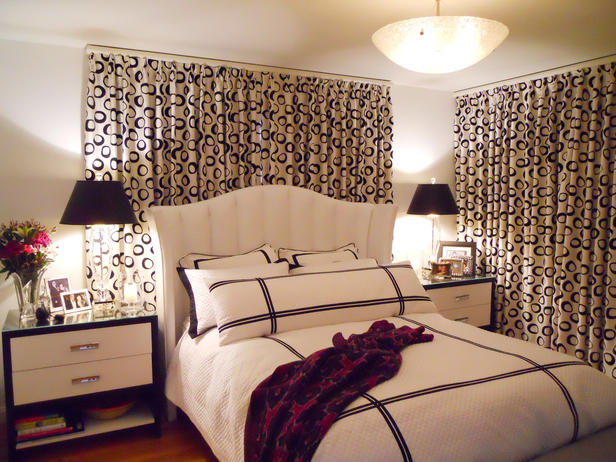
Choose a traverse or gathered rod and cover the entire wall by hanging pleated window treatments from floor to ceiling. Chicago-based designer Mary Susan Bicicchi creates a coccon-like feel with black-and-white patterned drapes in her own bedroom. Use the treatment to make a small room feel larger or open up a room with tall, skinny windows like hers. Image Courtesy of Mary Susan Bicicchi.

Hang in Layers

To soften the look and add dimension to a bedroom window, California-based designer Lada Webster loves to use layers. She suggests adding a pattern to one of the layers to create a whimsical look or touch of character. Then it becomes a focal point in your private space. Image Courtesy of Lada Webster.

Metallic Finishes

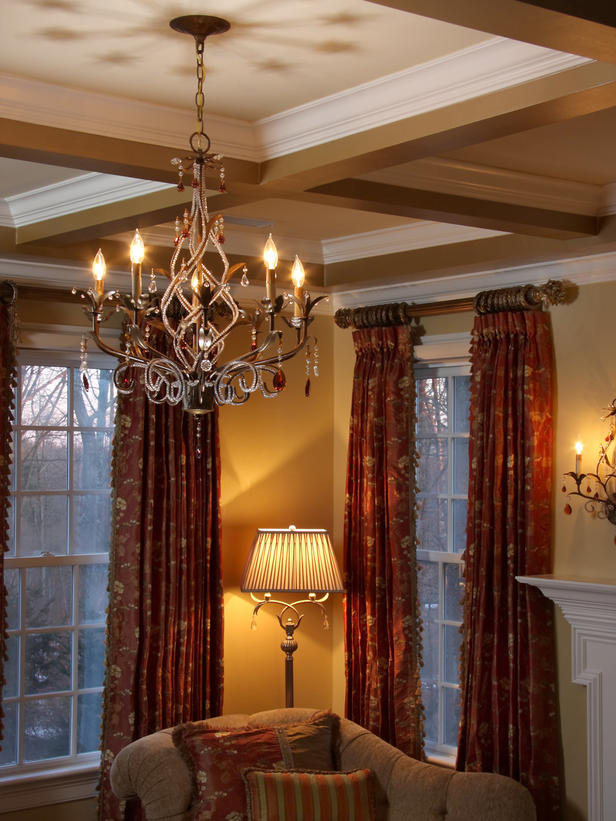
If it's drama you like, you can get it with hardware. New Englander Sharon McCormick loves bedroom drapes that hang from large wooden rods in metallic finishes. Add more personality to the frame by selecting elaborate, crystal or fabric-wrapped finials. Image Courtesy of Sharon McCormick. Photo by Urso Photography.

Oversized Hardware

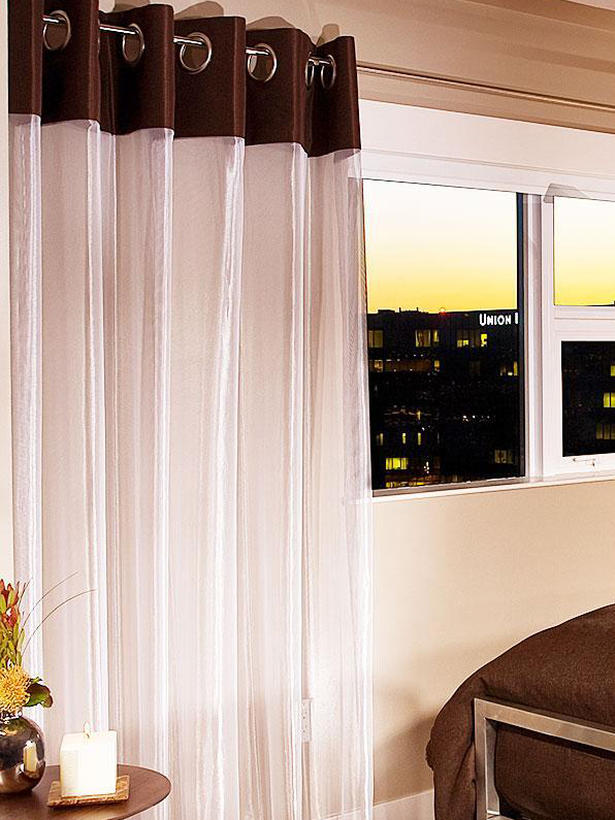
DrapeStyle designer Rick Thompson created this urban chic panel with oversized grommets and topped off with chocolate brown silk banding. The lighter metallic mesh fabric provides privacy, yet still allows light into the room. Oversized grommets work well in a smaller space with fewer windows and in contemporary settings, if you want the hardware revealed. Image Courtesy of DrapeStyle.

Trim With Fabric

Add a fun element to the bedroom decor with a simple, rectangular valance accentuated with beaded fringe, says Washington state designer Natalia Smith. It's a clean, unobstructed look that opens the room to light and color and adds the finishing touch — as long as the fabric in the valance matches what's on the pillows and bedding. Smith prefers a cornice with simple padding and a finished edge at the bottom for transitional, as opposed to traditional, style. Image Courtesy of Natalia Smith.